
Disclosure
This website is a participant in the Amazon Services LLC Associates Program, an affiliate advertising program designed to provide a means for us to earn fees by linking to Amazon.com and affiliated sites.
Reading car jump starter pack voltage correctly tells you whether your portable booster is ready to rescue a dead battery. This complete guide shows you exactly where to look, what numbers matter, and when to recharge.
You will learn to interpret resting, peak, and cranking voltage, spot a failing pack early, and apply expert tips for safe testing. Keep reading to turn confusing readouts into confident, roadside-ready decisions.
Key Takeaways
- 12.6V is a healthy resting reading for most lithium jump starters.
- Below 12V means recharge now; below 11V, expect a failed jump.
- Test at the clamps, not the display, to catch cable or connection loss.
- Voltage sag under load reveals a weak pack better than any idle reading.
- Recharge every 3-6 months to prevent silent self-discharge damage.
Best Jump Starter Packs for Reliable Voltage Readings – Detailed Comparison
NOCO Boost Plus GB40 – Best Overall Choice
The NOCO Boost Plus GB40 is the best option for beginners who want clear, trustworthy voltage feedback. Its 1000-amp output starts gas engines up to 6.0L, while built-in LED indicators show charge status instantly. Recommended for daily drivers needing dependable, no-guesswork jumps.

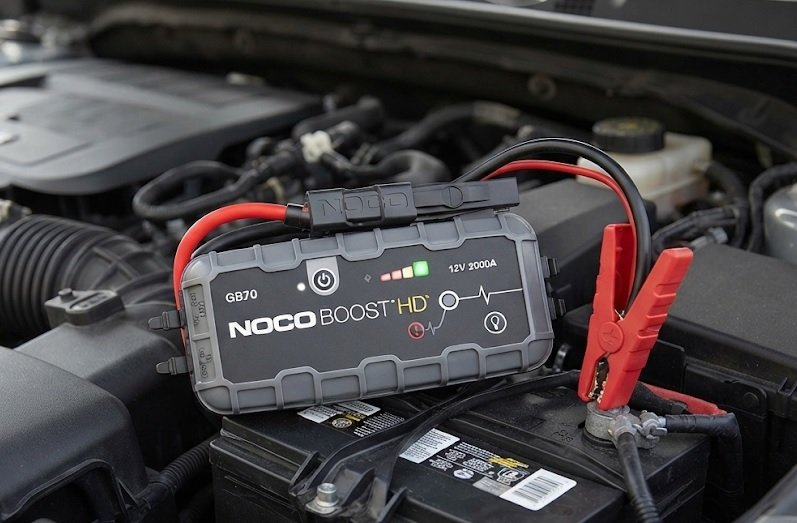
NOCO Boost HD GB70 – Best for Trucks and SUVs
The NOCO Boost HD GB70 delivers 2000 amps, making it ideal for trucks, SUVs, and diesel engines up to 8.0L. Its voltage-readout interface and 12V output port let you monitor pack health precisely. A proven pick for owners of larger vehicles who demand accurate, high-capacity performance.
GOOLOO GP4000 – Best Budget-Friendly Option
The GOOLOO GP4000 offers 4000 peak amps at a budget price, handling gas and diesel engines up to 10.0L. Its smart jumper clamps and visible battery level display simplify voltage checks. A strong value choice for occasional users wanting solid performance without premium cost.

How to Read Jump Starter Pack Voltage: Step-by-Step Guide
Reading your jump starter’s voltage is simple once you know which numbers matter. Follow these proven steps to get an accurate reading every time.
Step 1: Check the Resting Voltage Before Use
Press the power button and read the display without connecting clamps. This resting voltage reveals your pack’s true charge state.
- 12.6V or higher: Fully charged and ready to jump
- 12.0V to 12.5V: Partially drained; recharge soon
- Below 12.0V: Too weak for a reliable jump
Step 2: Test Voltage at the Clamps Under Load
A display reading can mislead you if cables or clamps are damaged. Test directly at the clamp tips with a multimeter during a jump attempt.
If voltage sags below 9.6V while cranking, your pack is failing. This voltage drop test exposes weak cells that idle readings hide.
Quick Reference: Voltage Meanings
- 12.6V+ = healthy and charged
- 12.0-12.5V = recharge needed
- Under 12V = unreliable, recharge now
Step 3: Compare Readings Over Time
Voltage that drops quickly after charging signals a dying battery pack. Track readings weekly to spot this trend early.
Consistent readings above 12.4V mean your jump starter is healthy. Rapid self-discharge points to internal cell damage needing replacement.
Common Voltage Problems and What They Mean
Not every reading tells the same story. Understanding common voltage issues helps you diagnose problems fast and avoid a failed roadside jump.
Why Your Jump Starter Shows Low Voltage After Charging
A pack that reads low right after a full charge usually has internal cell damage. This happens from over-discharge, heat exposure, or age.
- Swollen casing: Replace immediately; unsafe to use
- Fast self-discharge: Cells no longer hold charge
- Inconsistent readings: Faulty internal wiring or BMS
Voltage Drops When You Connect the Clamps
Reverse polarity or a short circuit causes instant voltage collapse. Modern packs shut down to protect themselves, but repeated events damage them.
Always connect positive to positive and negative to negative. Check clamp alignment before every jump attempt.
Display Reads Full but the Car Won’t Start
A full display with a failed jump points to cable resistance or a dead vehicle battery. Thin or corroded cables choke current flow.
| Symptom | Likely Cause | Fix |
|---|---|---|
| Low after charging | Dead cells | Replace pack |
| Drops on connect | Reverse polarity | Recheck clamps |
| Full but no start | Cable resistance | Clean or replace cables |
Diagnostic Shortcut
- Low after charge = dead cells
- Drops on connect = polarity issue
- Full but no start = cable or car battery fault
Maintenance Tips to Keep Jump Starter Voltage Healthy
Proper care keeps your jump starter voltage stable for years. These simple habits prevent the slow decline that catches drivers off guard.
How Often Should You Recharge a Jump Starter?
Recharge every 3 to 6 months, even if the pack sits unused. Lithium packs self-discharge slowly and can drop below safe levels.
- Every 3 months: Ideal for frequent users
- Every 6 months: Minimum for stored packs
- After every use: Recharge within 24 hours
Best Storage Conditions for Stable Voltage
Store your pack in a cool, dry place between 60°F and 80°F. Extreme heat accelerates cell degradation and voltage loss.
Avoid leaving it in a hot car trunk for long periods. Temperature swings damage lithium cells faster than regular use.
Signs It’s Time to Replace Your Jump Starter
Some voltage problems cannot be fixed with charging alone. Watch for these replacement signals.
- Voltage stays under 12V after a full charge
- Swollen or leaking casing appears
- Jump success rate drops noticeably
- Pack is over 3-4 years old
Maintenance Checklist
- Recharge every 3-6 months
- Store cool and dry (60-80°F)
- Replace if voltage stays low or casing swells
Tools and Techniques for Accurate Voltage Testing
Precise readings require the right tools. A basic multimeter and a few smart habits turn guesswork into confident diagnosis.
What You Need to Test Jump Starter Voltage
You do not need expensive equipment to check your pack’s health. These affordable tools deliver accurate results.
- Digital multimeter: Reads voltage to 0.01V accuracy
- DC load tester: Simulates cranking draw
- Infrared thermometer: Spots overheating cells
How to Use a Multimeter on a Jump Starter
Follow these steps for a reliable voltage reading every time.
- Set the multimeter to DC voltage (20V range)
- Touch the red probe to positive and black to negative
- Read the display and note the value
- Repeat after 10 minutes to check stability
Interpreting Load Test Results
A load test reveals how voltage behaves under real cranking demand. This separates healthy packs from weak ones.
| Load Voltage | Pack Condition |
|---|---|
| Above 10.5V | Healthy and reliable |
| 9.6V to 10.5V | Marginal; monitor closely |
| Below 9.6V | Failing; replace soon |
Testing Essentials
- Use a digital multimeter set to DC 20V
- Load test beats idle readings for accuracy
- Below 9.6V under load means replace the pack
Safety Precautions When Checking Jump Starter Voltage
Voltage testing involves live electrical components. Following basic safety rules protects both you and your equipment.
Essential Safety Rules Before Testing
Always prioritize safety over speed when working with any jump starter. These precautions prevent shocks, sparks, and damage.
- Remove jewelry: Metal rings and watches can arc
- Work in ventilated areas: Avoid hydrogen gas buildup
- Never touch both probes: Prevents short circuits
- Inspect cables first: Look for fraying or exposed wire
Handling Damaged or Swollen Packs
A swollen jump starter is a serious hazard. Lithium cells in this state can vent, catch fire, or explode under load.
Stop testing immediately if you notice swelling, hissing, or unusual heat. Move the pack outdoors and away from flammable materials.
What to Do If Voltage Testing Goes Wrong
Accidents happen even with careful handling. Knowing the right response minimizes risk.
- Disconnect immediately if you see sparks or smoke
- Do not touch hot clamps with bare hands
- Ventilate the area if you smell burning
- Dispose of damaged packs at approved recycling centers
Safety Essentials
- Remove jewelry and work in ventilated spaces
- Stop testing swollen or hot packs immediately
- Recycle damaged units; never throw them in trash
Jump Starter Voltage vs Car Battery Voltage: Key Differences
Many drivers confuse jump starter voltage with car battery voltage. They serve different roles, and mixing them up leads to wrong conclusions.
How the Two Voltage Systems Differ
A jump starter is a portable lithium pack, while a car battery is a heavy lead-acid unit. Both output 12V nominal, but behave differently under load.
- Jump starter: Lightweight, holds charge for months
- Car battery: Recharged by the alternator constantly
- Resting voltage: Similar (12.6V), but recovery differs
Why Your Car Battery Reads Low but the Jump Starter Is Fine
A car battery below 12.4V is undercharged, often from short trips or a failing alternator. The jump starter may be perfectly healthy.
Test both separately before assuming the pack is at fault. A weak alternator drains the car battery, not the jump starter.
| Reading | Jump Starter | Car Battery |
|---|---|---|
| 12.6V+ | Healthy | Healthy |
| 12.0-12.5V | Recharge soon | Undercharged |
| Below 12V | Weak pack | Needs charging or replacement |
Quick Comparison
- Both use 12V nominal, but different chemistry
- Low car battery often means alternator trouble
- Always test each component separately
Understanding Voltage Ratings Across Popular Jump Starter Brands
Different brands display voltage in different ways. Knowing what each manufacturer reports helps you compare packs fairly.
Lithium vs Lead-Acid Voltage Behavior
Lithium jump starters hold voltage steady until nearly empty. Lead-acid packs sag gradually as charge drops.
- Lithium (LiFePO4): Flat discharge curve, sudden drop at end
- Lead-acid: Linear decline, easier to predict
- Li-ion: Similar to LiFePO4 but heat-sensitive
Why Brand Displays Can Mislead You
Some brands show percentage instead of voltage. Others display voltage only when clamps connect.
A four-bar indicator may show “full” at 12.2V, which is actually half-charged. Always verify with a multimeter for accuracy.
Peak Amps vs Actual Voltage Output
Marketing highlights peak amps, but voltage under load matters more for starting power.
| Rating | What It Means | Real-World Impact |
|---|---|---|
| Peak amps | Maximum burst output | Marketing figure |
| Cranking amps | Sustained output | Actual starting power |
| Voltage under load | Real performance | Best health indicator |
Brand Comparison Basics
- Lithium holds voltage flat; lead-acid declines gradually
- Percentage displays can mislead; verify with a meter
- Voltage under load beats peak amp claims
Conclusion: Mastering Jump Starter Pack Voltage Readings
Reading car jump starter pack voltage is a simple skill with big payoffs. You now know how to check resting voltage, spot load failures, and maintain your pack properly.
Remember the golden rule: test under load, not just at idle. Recharge every few months and replace packs that stay below 12V.
Grab your multimeter today and check your jump starter. A five-minute test could save you from a stranded roadside.
With these proven methods, you will always know your pack is ready when it matters most.
Frequently Asked Questions about Reading Car Jump Starter Pack Voltage
What voltage should a fully charged jump starter read?
A fully charged lithium jump starter should read 12.6V or higher at rest. Readings between 12.6V and 13.0V indicate a healthy, ready-to-use pack.
If your pack reads below 12.4V, recharge it before relying on it. Consistent readings under 12V after charging mean the cells are failing.
How do I check my jump starter voltage without a multimeter?
Most modern jump starters display voltage or charge percentage on a built-in screen. Press the power button and read the indicator directly.
However, built-in displays can be inaccurate. For precise readings, a digital multimeter connected to the clamps remains the best option.
Why does my jump starter voltage drop when I connect the clamps?
A voltage drop on connection usually signals reverse polarity or a short circuit. Modern packs shut down automatically to prevent damage.
Double-check that red connects to positive and black to negative. If the drop persists with correct polarity, inspect your cables for internal damage.
How often should I recharge my jump starter to maintain voltage?
Recharge your jump starter every 3 to 6 months, even when unused. Lithium packs self-discharge slowly and can fall below safe levels.
After every jump, recharge within 24 hours. Frequent top-ups extend pack lifespan and keep voltage readings stable over time.
What is the best way to test jump starter voltage under load?
Connect a DC load tester or attempt a jump while watching the voltage display. Healthy packs stay above 10.5V during cranking.
Readings between 9.6V and 10.5V are marginal. Anything below 9.6V under load means the pack cannot deliver reliable starting power.
Can a jump starter show full voltage but still fail to start a car?
Yes, this happens when cables have high resistance or the car battery is completely dead. The pack reads fine but cannot push current through.
Inspect clamps for corrosion and test the vehicle battery separately. A failed alternator often mimics a jump starter problem.
What voltage indicates a jump starter needs replacement?
Any reading that stays below 12V after a full charge signals replacement. Swollen casings or rapid self-discharge confirm the diagnosis.
Most lithium jump starters last 3 to 4 years with proper care. Beyond that, internal cell degradation makes reliable performance unlikely.
Is it safe to test jump starter voltage while it is charging?
No, avoid voltage testing during charging. Readings will be artificially high and may damage your multimeter or the pack’s circuitry.
Always disconnect the charger and wait 10 minutes. This lets the pack settle for an accurate resting voltage measurement.