
Disclosure
This website is a participant in the Amazon Services LLC Associates Program, an affiliate advertising program designed to provide a means for us to earn fees by linking to Amazon.com and affiliated sites.
An e-bike battery not charging usually points to a faulty charger, damaged wiring, or worn cells. This complete guide shows you how to diagnose the real cause fast and safely.
You’ll learn step-by-step charger and cell checks, plus expert tips to revive a dead pack. Keep reading to find the fault and get back on the road with proven methods.
Key Takeaways
- Test the charger first with a multimeter; it causes most charging failures.
- Check the fuse, charge port, and wiring for visible damage or corrosion.
- Measure cell voltage to spot a dead BMS or worn-out pack.
- Never charge a swollen, wet, or overheating battery.
Best E-Bike Battery Charger Tools and Testers for Diagnosing Charging Faults
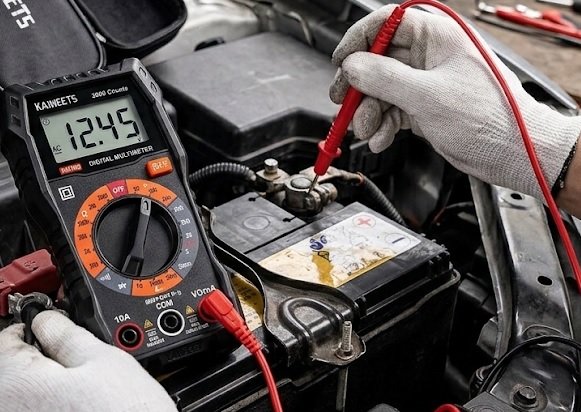
KAIWEETS KM100 Digital Multimeter – Best Overall Choice
The KAIWEETS KM100 is the recommended tool for testing charger output and cell voltage. Its auto-ranging design and clear LCD make voltage checks simple for beginners. This best option handles DC readings up to 600V, ideal for 36V, 48V, and 52V e-bike packs. A reliable first step in any diagnosis.
HTRC B6 V2 80W Balance Charger – Best for Cell Testing
The HTRC B6 V2 is ideal for checking and balancing individual lithium cells. It displays per-cell voltage, exposing weak or dead cells hidden inside the pack. With 80W output and multi-chemistry support, it’s recommended for diagnosing unbalanced batteries before replacing an expensive pack.

Grin Technologies Satiator – Best Smart Charger Replacement
The Grin Satiator is the best option if your original charger failed. This programmable charger supports 24V to 72V systems and shows real-time charging data. Its adjustable current and voltage settings make it ideal for testing whether the battery or charger is truly the problem.
Why Your E-Bike Battery Won’t Charge: Common Causes Explained
Most charging failures trace back to one of three culprits: the charger, the wiring, or the cells themselves. Identifying which one is failing saves you money and time. Start with the simplest checks before assuming the worst.
Charger Faults That Stop Charging
A dead charger is the most common reason an e-bike battery won’t charge. Internal components like capacitors and fuses fail over time.
- No output voltage: The charger powers on but delivers nothing to the battery.
- Blown fuse: A cheap fix, but easy to overlook during diagnosis.
- Damaged cable or plug: Bent pins and frayed wires block current flow.
Wiring and Connection Problems
Even a perfect charger fails if power can’t reach the cells. Inspect the charge port and internal harness for damage.
- Corroded charge port: Moisture and road salt cause resistance and poor contact.
- Loose BMS connector: A disconnected sense wire halts charging entirely.
- Broken charge fuse: Many packs hide a fuse inside the battery case.
Cell and BMS Failures
When the charger and wiring check out, the fault lies inside the pack. A Battery Management System (BMS) can shut down charging to protect damaged cells.
- Dead cell group: One weak group drags the whole pack below cutoff voltage.
- BMS in protection mode: Over-discharge or short circuits trigger a permanent lockout.
- Age-related capacity loss: Packs past 500 cycles often refuse to accept a full charge.
Quick Diagnosis Order
- Test charger output voltage first.
- Inspect wiring, fuses, and charge port second.
- Measure cell voltages and BMS behavior last.
How to Test an E-Bike Charger and Battery Cells Step by Step
Diagnosing a charging fault requires a logical sequence, not guesswork. Follow these numbered steps using a multimeter to isolate the problem safely. Always wear gloves and work in a dry, well-ventilated area.
Step 1: Test the Charger Output Voltage
Plug the charger into the wall, then measure the output plug with your multimeter.
- Set the multimeter to DC voltage.
- Touch the probes to the charger’s output pins.
- Compare the reading to the charger’s rated voltage (e.g., 42V for 36V packs).
A reading far below spec means the charger is faulty. No reading at all suggests a blown fuse or dead unit.
Step 2: Inspect Wiring, Fuses, and the Charge Port
With the charger ruled out, examine the path power travels into the pack.
- Charge port: Look for bent pins, corrosion, or debris blocking contact.
- Inline fuse: Test continuity; replace if blown.
- Harness: Wiggle wires while watching for intermittent voltage drops.
Step 3: Measure Individual Cell Group Voltages
Open the pack and measure each cell group at the BMS balance connector. Healthy lithium cells should read within 0.05V of each other.
| Reading | Diagnosis |
|---|---|
| All groups equal, pack won’t charge | Likely BMS fault |
| One group near 0V | Dead cell group |
| Groups vary widely | Unbalanced pack |
Test Sequence Recap
- Charger output first, wiring second, cells last.
- Compare every reading to rated specifications.
- Stop immediately if you smell burning or see swelling.
How to Fix an E-Bike Battery That Won’t Charge: Solutions and Safety
Once you’ve identified the fault, the fix is often simpler than expected. Some repairs cost under $20, while others require a full pack replacement. Match your solution to the diagnosis from the previous section.
Quick Fixes for Charger and Wiring Issues
Most charging problems resolve without touching the cells themselves.
- Replace the charger: Buy a unit matching your pack’s exact voltage and connector type.
- Swap the fuse: Use an identical amperage rating, never higher.
- Clean the charge port: Remove corrosion with contact cleaner and a soft brush.
- Reseat the BMS connector: A firm push often restores charging instantly.
Reviving a Deeply Discharged or Unbalanced Pack
A pack that sat unused for months may fall below the BMS cutoff voltage. A balance charger like the HTRC B6 V2 can slowly recharge individual cell groups.
- Set the charger to the correct chemistry and cell count.
- Charge at a low current (0.5A) until cells reach 3.0V.
- Switch to the pack’s standard charger once balanced.
Never force-charge cells reading below 2.0V; they may be internally damaged.
When to Replace the Battery Instead
Some failures aren’t worth repairing. Replace the pack if you notice any of these signs:
- Swollen or deformed cells: A serious fire risk, never recharge.
- Multiple dead cell groups: Rebuilding costs more than a new pack.
- Over 500 charge cycles: Capacity loss becomes permanent.
- Water damage: Internal corrosion spreads unpredictably.
Safety First
- Never charge a swollen, wet, or overheating battery.
- Replace rather than repair packs with multiple dead cells.
- Always match charger voltage, amperage, and connector type.
Preventing E-Bike Battery Charging Problems: Maintenance and Best Practices
Most charging failures are preventable with consistent care. Proper charging habits extend pack life well beyond 500 cycles. These practices protect both your battery and your wallet.
Smart Charging Habits That Extend Battery Life
How you charge matters as much as how often. Follow these proven routines for lithium e-bike packs.
- Store at 50-60% charge: Never leave a pack full or empty for long periods.
- Charge at room temperature: Cold cells accept charge poorly and degrade faster.
- Unplug after full charge: Avoid leaving chargers connected overnight.
- Use the OEM charger: Mismatched voltage or amperage damages cells.
Seasonal Storage Tips for E-Bike Batteries
Winter storage causes more charging failures than daily riding. A pack left at 0% for months may never recover.
- Charge the pack to roughly 50% before storing.
- Remove the battery from the bike and keep it indoors.
- Recharge to 50% every 2-3 months.
- Store between 10°C and 20°C in a dry location.
Routine Inspection Checklist
Quick monthly checks catch small issues before they become expensive failures.
| Check | Frequency | Warning Sign |
|---|---|---|
| Charge port | Monthly | Corrosion or bent pins |
| Charger cable | Monthly | Fraying or heat |
| Battery case | Monthly | Swelling or cracks |
| Cell balance | Every 3 months | Voltage drift above 0.05V |
Prevention Essentials
- Store packs at 50% charge, never empty or full.
- Recharge stored batteries every 2-3 months.
- Inspect ports, cables, and cases monthly.
When to Repair, Replace, or Seek Professional Help for a Dead E-Bike Battery
Not every charging fault is a DIY job. High-voltage packs store dangerous energy, and mistakes can cause fires. Knowing when to call a professional protects your safety and your investment.
Repair vs. Replace: Making the Right Call
Use cost and pack condition to guide your decision. A simple rule: if repairs exceed half the price of a new pack, replace it.
| Scenario | Best Action |
|---|---|
| Blown fuse or faulty charger | Repair (cheap, easy) |
| One weak cell group | Repair if you’re experienced |
| Multiple dead groups | Replace the pack |
| Swollen or water-damaged cells | Replace immediately |
Signs You Should Call a Professional
Some situations demand expert hands and proper equipment. Stop and seek help if you encounter any of these:
- No multimeter experience: Probing a live pack can short cells.
- Sealed or potted packs: Many brands void warranties once opened.
- Persistent BMS lockout: Requires dealer software to reset.
- Burning smell or heat: Evacuate and contact a specialist.
Finding a Qualified E-Bike Battery Technician
Look for shops certified in lithium battery service, not general bike mechanics. Ask about insurance, testing equipment, and warranty terms before committing.
- Check manufacturer-authorized service centers first.
- Request a written diagnosis and quote.
- Confirm they recycle old packs responsibly.
Decision Guide
- Repair cheap faults; replace packs with multiple dead cells.
- Call a pro for sealed packs, BMS lockouts, or any heat or burning smell.
- Choose certified lithium battery technicians, not general mechanics.
E-Bike Battery Not Charging: Brand-Specific Faults and Error Codes
Different e-bike brands use unique BMS logic and error codes. Understanding your system’s signals speeds up diagnosis. Here are the most common brand-specific charging issues riders report.
Bosch, Shimano, and Yamaha System Faults
Major mid-drive brands lock charging when the BMS detects faults. These systems often display diagnostic codes on the display unit.
- Bosch: Error 4xx codes usually indicate charger or battery communication faults.
- Shimano STEPS: Flashing battery LEDs signal BMS protection mode.
- Yamaha: Charging stops if cell temperature drops below 0°C.
Most of these systems require dealer diagnostics to clear persistent errors.
Rad Power, Aventon, and Budget Brand Issues
Direct-to-consumer brands often use simpler BMS designs with fewer safeguards.
- Rad Power Bikes: A common fault is a blown internal fuse after voltage spikes.
- Aventon: Charging failures often trace to a loose XT60 or barrel connector.
- Generic packs: Cheap BMS units frequently fail without warning.
Reading Error Codes and LED Blink Patterns
Most batteries communicate faults through LED sequences. Count the blinks before consulting your manual.
| Signal | Likely Cause |
|---|---|
| 1 blink, repeating | Under-voltage protection |
| 3 blinks | Over-temperature cutoff |
| 5 blinks | Cell imbalance or BMS fault |
| Solid red light | Charger fault or wrong voltage |
Brand Diagnostics
- Bosch, Shimano, and Yamaha faults often need dealer tools.
- Budget brands usually have simpler, repairable faults.
- Count LED blinks and match them to your manual’s code list.
Frequently Overlooked Reasons an E-Bike Battery Won’t Charge
Sometimes the fault isn’t inside the battery at all. External factors and user errors cause charging failures that mimic dead cells. Check these overlooked culprits before condemning your pack.
Temperature and Environmental Factors
Lithium batteries refuse to charge outside a safe temperature window. This protection prevents permanent damage but confuses many riders.
- Below 0°C: The BMS blocks charging to prevent lithium plating.
- Above 45°C: Thermal protection halts charging to avoid runaway risk.
- High humidity: Condensation inside the charger triggers safety cutoffs.
Let the pack reach room temperature for 1-2 hours before retrying.
Charger Compatibility and Voltage Mismatches
Not all chargers work with all packs, even at the same nominal voltage. A mismatched charger may appear functional but deliver nothing.
- Wrong connector: A loose or different plug prevents contact entirely.
- Voltage mismatch: A 54.6V charger won’t properly charge a 58.8V pack.
- Communication handshake: Smart packs reject non-OEM chargers.
User Errors and Hidden Switches
Simple mistakes account for a surprising number of “dead” batteries.
- Check the battery’s power switch is off during charging.
- Verify the wall outlet works with another device.
- Confirm the charge port cover isn’t blocking full insertion.
- Ensure the charger LED changes from red to green.
Overlooked Checks
- Charge only between 0°C and 45°C.
- Match charger voltage, connector, and brand compatibility.
- Verify outlets, switches, and LED indicators before diagnosing cells.
Conclusion: Fixing an E-Bike Battery Not Charging
An e-bike battery not charging is rarely a mystery once you test in order. Check the charger, inspect the wiring, then measure cell voltages. Most faults are cheap and simple to fix.
Test before you replace. A multimeter saves money and confirms the real culprit. Always prioritize safety with swollen or damaged packs.
Grab your tools and run the checks above today. Follow these steps, and you’ll ride again soon.
Frequently Asked Questions about an E-Bike Battery Not Charging
What is the most common reason an e-bike battery won’t charge?
A faulty charger is the most common cause. Internal fuses, capacitors, and cables fail over time. Test the charger’s output voltage with a multimeter before blaming the battery.
If output reads zero or far below spec, replace the charger. Wiring issues and blown fuses inside the pack rank second. Cells themselves fail least often.
How to tell if my e-bike battery or charger is broken?
Measure the charger’s output plug with a multimeter set to DC voltage. A healthy charger matches its rated voltage, like 42V for a 36V pack. No reading means the charger is broken.
If the charger tests fine but the battery still won’t charge, the fault lies inside the pack. Check the charge port, fuse, and BMS next.
Can a completely dead e-bike battery be revived?
Sometimes, if only one cell group is deeply discharged. A balance charger can slowly recharge individual groups to safe voltage. This works best on packs stored unused for months.
Packs with multiple dead groups, swollen cells, or water damage cannot be safely revived. Replace these batteries immediately to avoid fire risk.
Why does my e-bike charger show green but the battery stays empty?
A green light with no charge usually means a broken connection. The charger senses full voltage but current never reaches the cells. Inspect the charge port and connector pins.
A faulty BMS or blown internal fuse can also cause this. Test charger output first, then trace the path into the pack.
What is the best way to store an e-bike battery for winter?
Charge the pack to roughly 50% and store it indoors. Keep it between 10°C and 20°C in a dry location. Never store a battery fully empty or fully charged.
Recharge to 50% every 2-3 months. This prevents deep discharge and keeps cells balanced. Proper storage avoids most spring charging failures.
How many charge cycles does an e-bike battery last?
Most lithium e-bike batteries last 500 to 1,000 charge cycles. After that, capacity drops noticeably and charging may fail. Signs include shorter range and longer charge times.
Good habits extend lifespan. Avoid full discharges, charge at room temperature, and use the OEM charger for best results.
Is it safe to leave my e-bike battery charging overnight?
It’s generally safe with a quality BMS, but not recommended. Modern chargers stop at full voltage, yet faults can cause overheating. Unplug once the light turns green.
Charge during the day when you can monitor it. Never charge a swollen, wet, or damaged battery under any circumstances.
When should I replace my e-bike battery instead of repairing it?
Replace the pack if repairs cost more than half a new battery. Multiple dead cell groups, swelling, or water damage also demand replacement. These faults aren’t worth the risk.
Simple fixes like fuses, chargers, or one weak cell group are worth repairing. For sealed packs or BMS lockouts, consult a certified technician.