
Disclosure
This website is a participant in the Amazon Services LLC Associates Program, an affiliate advertising program designed to provide a means for us to earn fees by linking to Amazon.com and affiliated sites.
The best battery setup for a camper van pairs lithium (LiFePO4) batteries with a 200–400Ah bank, DC-DC charger, and solar input. This proven layout delivers reliable off-grid power for lights, fridges, and devices.
This complete guide breaks down battery types, capacity sizing, wiring layouts, and expert tips for building a safe, efficient system. Read on to design a camper van battery setup that matches your travel style and budget.
Key Takeaways
- LiFePO4 batteries win on weight, depth of discharge, and lifespan despite higher upfront cost.
- 200–400Ah suits most van lifers; size your bank to daily watt-hour use, not guesswork.
- DC-DC chargers safely charge lithium from your alternator while driving.
- 300–600W solar keeps a typical setup topped up during extended off-grid stays.
- Fusing, correct cable gauge, and a shunt monitor are non-negotiable for safety and accuracy.
Best Battery Products for a Camper Van Setup – Detailed Comparison
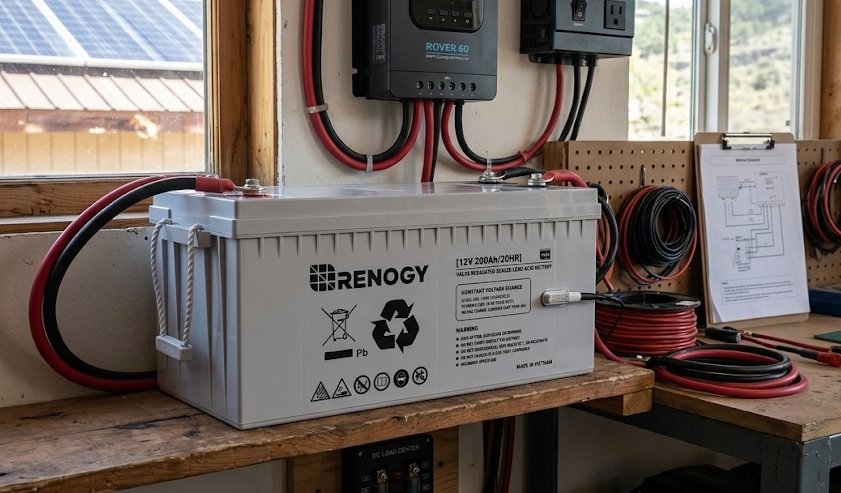
Renogy 200Ah LiFePO4 Battery – Best Overall Choice
The Renogy 200Ah LiFePO4 is the recommended pick for most van builds. It offers 4,000+ charge cycles, a built-in BMS, and 100% usable capacity. Ideal for running fridges, lights, and laptops, this best option balances price, safety, and proven reliability.
Battle Born 270Ah 8D LiFePO4 – Best for High Power Demands
The Battle Born 270Ah 8D suits large rigs with heavy loads like induction cooktops and AC units. Its rugged build and 10-year warranty justify the premium price. This is the best option for full-time van lifers demanding maximum capacity from a single battery.
Renogy 100Ah Smart Lithium Battery – Best Budget-Friendly Pick
The Renogy 100Ah Smart Lithium delivers excellent value for smaller builds. Weighing just 26 lbs, it pairs well with modest solar arrays. Ideal for weekend warriors, this recommended option lets you scale up by adding batteries as your power needs grow.

How to Choose the Best Battery Setup for a Camper Van
Choosing the right camper van battery setup starts with understanding your power needs and the battery technologies available. This section covers the key factors that determine performance, cost, and longevity.
Understanding Camper Van Battery Types
Three battery chemistries dominate van conversions, each with distinct trade-offs. Your choice affects weight, cost, and usable capacity.
- Lead-Acid (AGM/Gel): Cheap and widely available, but only 50% depth of discharge and heavy.
- Lithium (LiFePO4): 100% usable capacity, 4,000+ cycles, and roughly half the weight.
- Carbon-Foam: A hybrid option with faster charging but limited availability.
Sizing Your Battery Bank Correctly
Undersized banks drain fast; oversized banks waste money and space. Calculate daily watt-hours first, then double it for cloudy days or high-draw appliances.
| Daily Use | Recommended Bank |
|---|---|
| Light (lights, phone, laptop) | 100–200Ah |
| Moderate (+ 12V fridge) | 200–300Ah |
| Heavy (+ inverter, induction) | 300–400Ah+ |
Charging Sources That Work Together
A reliable setup combines multiple charging inputs for redundancy. Solar handles long stays, while alternator charging covers driving days.
- Solar panels: 300–600W keeps most banks topped up.
- DC-DC charger: Charges lithium safely from your alternator.
- Shore power: A smart charger for campsites and hookups.
Wiring and Safety Essentials for Your Camper Van Battery System
A safe camper van battery setup depends on correct wiring, proper fusing, and quality components. Skipping these steps risks fires, damaged batteries, and costly failures.
Essential Components for a Safe Installation
Every off-grid electrical system needs protection between the battery and every connected circuit. These parts form the backbone of a reliable build.
- Fuses and breakers: Place a main fuse within 18 inches of the battery positive terminal.
- Battery monitor (shunt): Tracks state of charge accurately, unlike voltage-only gauges.
- Bus bars: Keep connections tidy and simplify future upgrades.
Choosing the Right Cable Gauge
Undersized cables overheat and cause voltage drop. Match wire gauge to current draw and cable run length.
| Current Draw | Typical Gauge |
|---|---|
| Up to 30A | 10 AWG |
| 30–60A | 6 AWG |
| 100A+ (inverter) | 2/0 AWG |
Step-by-Step Wiring Order
Follow this sequence to avoid short circuits and damaged equipment during installation.
- Disconnect all power sources before touching any wiring.
- Mount the battery in a ventilated, secured compartment.
- Install the main fuse and connect the positive cable.
- Wire the shunt and monitor to the negative terminal.
- Test each circuit individually before powering the full system.
Quick Tip
- Always fuse at the battery, never at the device end.
- Use marine-grade lugs and heat-shrink tubing for lasting connections.
Real-World Camper Van Battery Setup Examples by Budget
Seeing how components combine into complete systems makes sizing decisions easier. These three proven layouts cover weekend trips, full-time travel, and high-power living.
Budget Weekend Setup (Under $1,000)
Perfect for short trips with minimal power demands. This layout keeps costs low while covering essentials.
- Battery: Single 100Ah LiFePO4
- Charging: 200W solar + basic DC-DC charger
- Runs: Lights, phone charging, 12V fridge for 1–2 days
Full-Time Traveler Setup ($2,500–$4,000)
The most popular configuration for van lifers living off-grid year-round. It balances capacity, charging speed, and cost.
- Battery: 200–300Ah LiFePO4 bank
- Charging: 400W solar + 30A DC-DC + shore power
- Runs: Fridge, laptop, lights, fans, and small inverter loads indefinitely
High-Power Off-Grid Setup ($5,000+)
Built for induction cooking, air conditioning, and remote work setups. Expect larger everything.
- Battery: 400Ah+ LiFePO4 with parallel wiring
- Charging: 600W+ solar + 60A DC-DC + 2000W inverter
- Runs: Heavy appliances and full-time remote work without compromise
| Setup | Bank Size | Best For |
|---|---|---|
| Budget | 100Ah | Weekend trips |
| Full-Time | 200–300Ah | Year-round van life |
| High-Power | 400Ah+ | AC, induction, remote work |
Quick Tip
- Buy once, cry once — upgrading a cheap system often costs more than building it right initially.
Common Mistakes to Avoid With Camper Van Battery Systems
Even well-planned builds fail when installers overlook a few critical details. Avoiding these pitfalls saves money, prevents damage, and keeps your system safe for years.
Mixing Battery Types and Ages
Never connect lithium and lead-acid batteries in the same bank. Even mismatched ages within one chemistry cause uneven charging and premature failure.
- Same chemistry: Keep every battery identical in type and brand.
- Same age: Replace the whole bank at once, not one unit.
- Same capacity: Parallel batteries should match Ah ratings closely.
Ignoring Temperature Limits
Lithium batteries cannot charge below 32°F (0°C) without damage. Many BMS units block charging automatically, but unheated compartments still risk issues.
- Insulate the battery compartment against extreme cold.
- Choose self-heated batteries for winter camping.
- Ventilate to prevent summer overheating.
Forgetting About Inverter Efficiency
Inverters lose 10–15% of power as heat during conversion. Oversizing an inverter for occasional use wastes battery capacity daily.
| Mistake | Consequence |
|---|---|
| Undersized cables | Voltage drop, fire risk |
| No main fuse | Short circuit damage |
| Voltage-only monitoring | Inaccurate state of charge |
Quick Tip
- Match inverter size to your largest load, not your total battery capacity.
Maintaining Your Camper Van Battery for Long-Term Performance
Proper maintenance extends battery life well beyond the warranty period. A few simple habits keep your camper van battery setup running efficiently for years.
Routine Checks and Care
Inspect your system monthly to catch small issues before they become expensive problems. Most maintenance takes under ten minutes.
- Check terminal connections for corrosion or looseness.
- Clean vents and fans around chargers and inverters.
- Review monitor data to spot unusual discharge patterns.
Storage Best Practices
How you store your van between trips directly affects battery health. Lithium batteries prefer partial charge over full depletion.
- Charge to 50–80% before long-term storage.
- Disconnect the bank to prevent parasitic drain.
- Store above freezing whenever possible.
- Recharge every 2–3 months during extended downtime.
When to Replace Your Battery
Watch for warning signs that indicate declining capacity. Early replacement prevents mid-trip failures.
| Warning Sign | Likely Cause |
|---|---|
| Faster discharge than usual | Capacity loss |
| Swollen casing | Internal damage |
| Charger never reaches full | Cell imbalance |
Quick Tip
- Log your monitor readings monthly — trends reveal problems long before failures do.
Cost Breakdown: What a Camper Van Battery Setup Really Costs
Budgeting for a camper van battery system means looking beyond the battery itself. Wiring, chargers, monitors, and installation add up quickly.
Typical Component Costs
Prices vary by brand and capacity, but these ranges reflect real-world 2024–2025 figures. Lithium systems cost more upfront yet last far longer.
| Component | Typical Cost |
|---|---|
| 100Ah LiFePO4 battery | $300–$600 |
| 200Ah LiFePO4 battery | $700–$1,200 |
| DC-DC charger | $150–$350 |
| Solar panels (400W) | $300–$600 |
| Battery monitor (shunt) | $50–$200 |
| Wiring, fuses, bus bars | $100–$300 |
DIY vs Professional Installation
Labor costs swing total project pricing dramatically. Decide based on your comfort with electrical work.
- DIY: Saves $500–$2,000 but requires research and patience.
- Professional: Ensures safety and warranty compliance.
- Hybrid: Install simple parts yourself, hire out inverter wiring.
Where to Save Without Cutting Corners
Smart trade-offs keep budgets realistic while protecting critical components.
- Buy quality batteries — they’re the hardest part to replace.
- Skip premium solar panels — budget brands perform similarly.
- Reuse existing wiring if it meets gauge requirements.
Quick Tip
- Budget 20% extra for unforeseen parts — projects rarely land exactly on estimate.
Upgrading and Expanding Your Camper Van Battery Setup
Power needs grow as van life evolves. Planning for expansion now prevents costly rewiring later and keeps your system flexible.
Signs You Need More Capacity
Your current bank may be undersized if you’re constantly watching the monitor. These signals indicate it’s time to upgrade.
- Battery drops below 50% daily despite adequate solar.
- You ration power or skip appliances to conserve energy.
- Charging takes all day to reach full capacity.
How to Expand Safely
Adding batteries works best when done correctly. Follow this sequence to avoid imbalance issues.
- Match chemistry and capacity to your existing bank.
- Buy batteries of similar age when possible.
- Wire in parallel using equal-length cables.
- Upgrade your charger if it can’t handle the new total.
- Recheck fusing for the increased current potential.
Adding Solar or Alternator Charging
More capacity often demands more charging input. Balance generation with storage for optimal performance.
| Upgrade | Best For |
|---|---|
| Extra solar panel | Extended off-grid stays |
| Higher-output DC-DC | Frequent driving days |
| Second alternator | High-power systems |
Quick Tip
- Oversize your wiring and charger from day one — future upgrades become plug-and-play.
Conclusion: Building the Best Battery Setup for a Camper Van
The best battery setup for a camper van combines lithium batteries, proper sizing, and multiple charging sources. With the right layout, you gain reliable off-grid power wherever you roam.
Prioritize safety, quality components, and room for growth. Plan your system once, and build it right.
Start by calculating your daily watt-hours today. Then choose a battery bank and charging setup that matches your travel style.
Your perfect van power system is closer than you think. Take the first step now.
Frequently Asked Questions About Camper Van Battery Setups
What is the best battery type for a camper van?
LiFePO4 (lithium iron phosphate) is the best battery type for most camper van builds. It offers 100% usable capacity, 4,000+ charge cycles, and weighs roughly half as much as lead-acid.
Lead-acid remains a budget option for occasional weekend use. However, lithium’s longer lifespan and deeper discharge usually make it cheaper per usable amp-hour over time.
How many amp-hours do I need for van life?
Most full-time van lifers need 200–400Ah of lithium capacity. Weekend travelers manage fine with 100–200Ah, while heavy power users running AC or induction may need 400Ah or more.
Calculate your daily watt-hours first, then double that figure for cloudy days and battery health. Sizing based on real consumption beats guesswork every time.
Can I charge my camper van battery while driving?
Yes, a DC-DC charger safely charges your house battery from the alternator while driving. It regulates voltage and protects both the starter and house batteries.
Lithium batteries require a charger with a lithium charging profile. Basic isolators work for lead-acid but can damage lithium without proper regulation.
How much solar power do I need for a camper van?
300–600W of solar suits most camper van battery setups. This range replenishes a 200–300Ah lithium bank during typical sunny days.
Roof space, shading, and location all affect output. Pair solar with alternator charging for reliable power even during cloudy stretches.
Is lithium worth the extra cost over AGM?
Yes, for most van lifers, lithium is worth the premium. It delivers twice the usable capacity, lasts 4–8 times longer, and saves significant weight.
AGM only makes sense for tight budgets or occasional use. Over a 10-year span, lithium typically costs less per cycle despite the higher upfront price.
Why is my camper van battery draining so fast?
Common causes include parasitic drain, undersized capacity, or failing cells. Inverters left on standby and old batteries are frequent culprits.
Use a shunt-based monitor to track consumption accurately. If capacity has dropped noticeably, test each battery and replace the bank if needed.
What size inverter do I need for my camper van?
Match inverter size to your largest single load, not total capacity. A 1,000–2,000W pure sine wave inverter handles most laptops, blenders, and small appliances.
Induction cooktops and air conditioners may demand 2,000–3,000W. Always confirm your battery bank and wiring can support the inverter’s peak draw.
Can I mix old and new batteries in one bank?
No, avoid mixing old and new batteries whenever possible. Mismatched ages cause uneven charging and shorten the entire bank’s lifespan.
If you must expand, match chemistry, capacity, and brand closely. For best results, replace the whole bank at once for balanced performance.