
Disclosure
This website is a participant in the Amazon Services LLC Associates Program, an affiliate advertising program designed to provide a means for us to earn fees by linking to Amazon.com and affiliated sites.
Learning how to add a second battery to a truck or SUV is the smartest way to power winches, fridges, and accessories without draining your starting battery. A dual battery setup delivers reliable off-grid power and total peace of mind.
This complete guide walks you through every step, from choosing the right battery type to wiring an isolator safely. You’ll also get expert tips on tools, mounting, and proven methods to avoid costly mistakes. Keep reading to build a bulletproof dual battery system.
Key Takeaways
- Isolators prevent your starting battery from draining when running accessories.
- AGM deep-cycle batteries outperform standard flooded batteries for auxiliary power.
- Use 4-6 AWG cable for runs under 15 feet to minimize voltage drop.
- Fuses within 18 inches of each battery protect against short circuits.
- Match battery chemistry and age to avoid charging imbalance.
Best Dual Battery Products for Truck and SUV Setups
REDARC BCDC1225D – Best Overall Choice
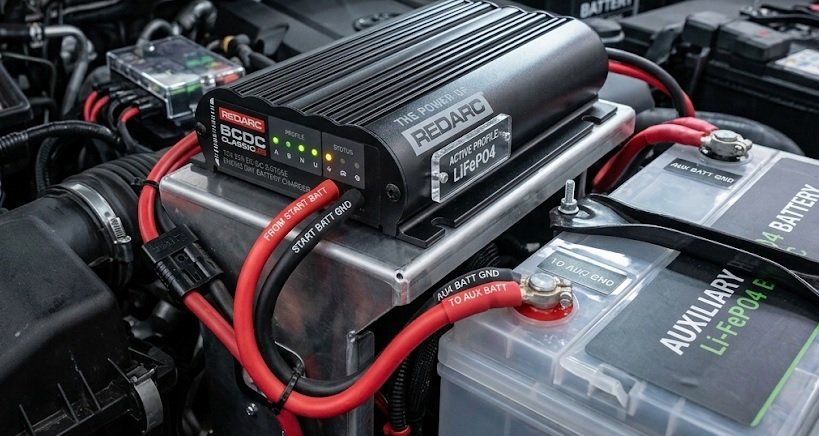
The REDARC BCDC1225D is the recommended option for most truck and SUV builds. This 25-amp DC-DC charger works with smart alternators and charges AGM, gel, and lithium batteries. Its built-in MPPT solar input makes it ideal for overlanding, and the compact design simplifies installation.
Blue Sea Systems 7622 ML-ACR – Best Automatic Isolator
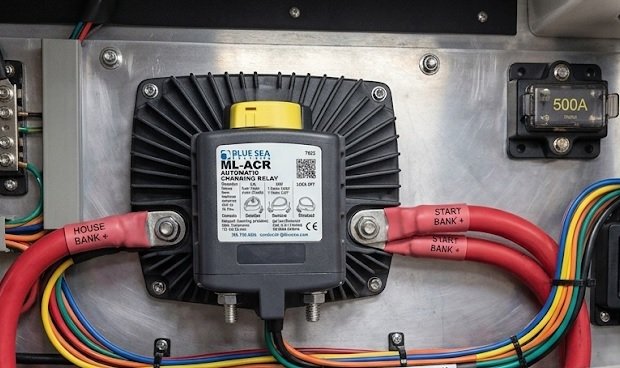
The Blue Sea Systems 7622 ML-ACR automatically combines batteries when charging and isolates them when discharging. Rated for 500 amps continuous, it handles heavy winch loads with ease. This is the best option for owners who want simple, maintenance-free dual battery management without manual switching.
Optima Batteries 8014-045 D34/78 YellowTop – Best Auxiliary Battery
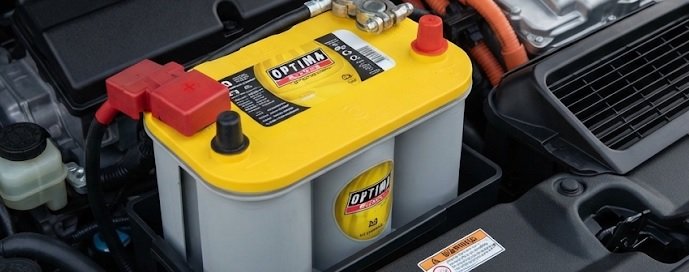
The Optima YellowTop D34/78 is a dual-purpose deep-cycle and starting battery built for accessory-heavy rigs. Its spill-proof AGM construction resists vibration, making it ideal for off-road use. With 750 CCA and 55 Ah capacity, it powers fridges and winches reliably.
How a Dual Battery System Works in Trucks and SUVs
A dual battery system separates your starting battery from an auxiliary battery that powers accessories. This prevents winches, fridges, and lights from draining the battery you need to start your engine.
Starting Battery vs. Auxiliary Battery
The starting battery delivers high cranking amps for brief, powerful bursts. The auxiliary battery, by contrast, provides steady deep-cycle power over long periods.
- Starting battery: Handles ignition, headlights, and ECU demands
- Auxiliary battery: Runs winches, fridges, inverters, and camp lighting
- Isolator or charger: Links both while protecting the starting battery
How Battery Isolators and DC-DC Chargers Differ
An isolator connects batteries only when the alternator charges, then disconnects them automatically. A DC-DC charger actively boosts voltage to properly charge modern AGM or lithium auxiliary batteries.
| Component | Best For | Key Benefit |
|---|---|---|
| Isolator | Simple setups | Low cost, easy install |
| DC-DC Charger | Smart alternators | Correct charging voltage |
Why Voltage Drop Matters
Long cable runs reduce voltage, slowing auxiliary battery charging. Keeping cables short and thick maintains efficient power transfer between batteries.
Quick Summary
- Dual batteries separate starting power from accessory power
- Isolators suit simple builds; DC-DC chargers suit modern vehicles
- Short, thick cables prevent voltage drop
Tools and Materials Needed to Install a Second Battery
Gathering the right tools before you start saves hours of frustration. A proper dual battery install requires quality wiring, safety gear, and basic hand tools.
Essential Tools Checklist
- Socket and wrench set: For terminals and mounting bolts
- Crimping tool: For secure, low-resistance cable lugs
- Heat gun: For shrinking protective tubing over connections
- Multimeter: For testing voltage and continuity
- Drill with step bit: For clean firewall and tray holes
Wiring and Safety Components
Use 4-6 AWG copper cable for runs under 15 feet to minimize voltage drop. Larger cable is needed for longer runs or heavy winch loads.
- Battery isolator or DC-DC charger: The core of your system
- ANL or MEGA fuses: Install within 18 inches of each battery
- Battery tray and hold-down: Secures the auxiliary battery
- Ring terminals and heat shrink: For corrosion-resistant connections
Choosing the Right Auxiliary Battery
Match your auxiliary battery chemistry to your charging system. AGM batteries suit most trucks, while lithium (LiFePO4) offers lighter weight and deeper discharge.
| Battery Type | Cost | Best Use |
|---|---|---|
| Flooded | Low | Budget builds |
| AGM | Medium | Most trucks/SUVs |
| Lithium | High | Weight-sensitive rigs |
Quick Summary
- Use 4-6 AWG cable and fuse within 18 inches of each battery
- AGM suits most builds; lithium saves weight
- Never skip the battery tray or hold-down
Step-by-Step Guide to Installing a Second Battery
Follow these steps carefully to add a second battery safely. Always disconnect the negative terminal first and work in a well-ventilated area.
Step 1: Mount the Auxiliary Battery
Choose a location away from heat and moving parts. Common spots include the engine bay, under the rear seat, or in the truck bed.
- Secure the tray: Bolt it to a solid metal surface
- Install the battery: Fasten the hold-down firmly
- Check clearance: Ensure no contact with hot or moving parts
Step 2: Wire the Isolator or DC-DC Charger
Mount the isolator or charger near the starting battery. Run positive cable from the starting battery to the unit, then to the auxiliary battery.
- Positive cable: Fuse within 18 inches of each battery
- Ground cable: Connect auxiliary battery to chassis
- Trigger wire: Tap an ignition source if required
Step 3: Test and Verify the System
Reconnect the negative terminal and start the engine. Use a multimeter to confirm the auxiliary battery receives 13.5-14.5 volts while running.
| Test | Expected Reading |
|---|---|
| Engine off, isolated | 12.6V+ auxiliary |
| Engine running | 13.5-14.5V charging |
Quick Summary
- Mount battery securely away from heat and moving parts
- Fuse both positive cables within 18 inches of each battery
- Verify 13.5-14.5V charging with a multimeter
Common Mistakes to Avoid When Adding a Second Battery
Even experienced installers make errors that shorten battery life or create safety hazards. Avoiding these pitfalls protects your investment and your vehicle.
Mismatched Battery Chemistry and Age
Never pair a new auxiliary battery with an old starting battery of different chemistry. Mismatched batteries charge unevenly, causing one to overcharge and the other to undercharge.
- Match chemistry: Keep AGM with AGM, lithium with lithium
- Match age: Replace both batteries within six months of each other
- Match capacity: Similar Ah ratings charge more evenly
Undersized Cables and Missing Fuses
Thin cables cause voltage drop and overheating, especially during heavy winch use. Skipping fuses risks a catastrophic short circuit and fire.
- Use 4-6 AWG: For runs under 15 feet
- Fuse both ends: Within 18 inches of each battery
- Crimp, don’t solder: Crimped lugs resist vibration better
Poor Mounting and Ventilation
A loose battery can short against metal or crack its case on rough trails. Flooded batteries also release hydrogen gas, so ventilation is critical.
| Mistake | Consequence |
|---|---|
| Mismatched batteries | Uneven charging, early failure |
| Undersized cable | Voltage drop, overheating |
| No fuse | Fire risk from short circuit |
Quick Summary
- Match battery chemistry, age, and capacity
- Always fuse both positive cables near each battery
- Mount securely and ventilate flooded batteries
Cost, Maintenance, and Real-World Performance
Understanding ongoing costs and upkeep helps you budget realistically. A well-built dual battery system lasts years with minimal attention.
Typical Cost Breakdown
Most DIY dual battery installs run $400 to $1,200 depending on components. Professional installation adds $300 to $800 in labor.
- Auxiliary battery: $150-$500 (AGM to lithium)
- Isolator or DC-DC charger: $100-$450
- Cables, fuses, and tray: $80-$250
Maintenance Tips for Long Battery Life
Check terminal connections every few months for corrosion or looseness. Clean terminals with a wire brush and apply dielectric grease to prevent buildup.
- Test voltage monthly: Confirm proper charging
- Equalize AGM batteries: Follow manufacturer guidance
- Avoid deep discharges: Keep above 50% for flooded, 20% for lithium
Real-World Performance Expectations
A 100Ah auxiliary battery can run a 50W fridge for roughly 20 hours before needing a recharge. Winches draw heavy current but only for short bursts.
| Accessory | Draw | Runtime (100Ah) |
|---|---|---|
| 50W fridge | ~4A | ~20 hours |
| LED camp lights | ~2A | ~40 hours |
| 12V inverter | Variable | Depends on load |
Quick Summary
- Expect $400-$1,200 for a quality DIY install
- Clean terminals and test voltage monthly
- A 100Ah battery runs a fridge roughly 20 hours
Advanced Dual Battery Configurations and Upgrades
Once your basic system works, you can expand it for greater capacity and flexibility. Advanced setups suit overlanders, campers, and heavy accessory users.
Adding Solar Charging to Your Setup
Solar panels keep your auxiliary battery topped up when parked for days. A DC-DC charger with MPPT input handles both alternator and solar charging seamlessly.
- 100W panel: Ideal for fridges and lights
- 200W+ panel: Suits heavy power users
- MPPT controller: Maximizes solar harvest
Lithium vs. AGM for Advanced Builds
Lithium (LiFePO4) batteries offer double the usable capacity at half the weight. They cost more upfront but last longer and charge faster than AGM.
| Feature | AGM | Lithium |
|---|---|---|
| Usable capacity | 50% | 80-90% |
| Weight | Heavy | Light |
| Cycle life | ~500 | ~3,000+ |
Multi-Battery and Dual Alternator Options
Extreme builds may use three or more batteries for winching, welding, or extended camping. A high-output alternator ensures all batteries charge quickly.
- Assess power needs: Total your accessory draw
- Upgrade alternator: 200A+ for heavy loads
- Add battery monitor: Track state of charge
Quick Summary
- Solar plus DC-DC charging keeps batteries topped up off-grid
- Lithium doubles usable capacity at half the weight
- High-output alternators support multi-battery builds
Frequently Asked Questions About Dual Battery Setups
These common questions cover the practical details most truck and SUV owners want answered before installing a second battery.
Can I Add a Second Battery Without an Isolator?
Yes, but only with caution. Connecting batteries directly in parallel lets them share charge but also lets accessories drain both simultaneously.
- Without isolator: Risk draining your starting battery
- With isolator: Protects starting power automatically
- Best practice: Always use an isolator or DC-DC charger
How Long Does Installation Take?
A basic DIY install takes 2 to 4 hours for most trucks and SUVs. Complex setups with solar or custom mounting may take a full day.
Do I Need a Bigger Alternator?
Most stock alternators handle a single auxiliary battery fine. Adding solar, lithium, or multiple batteries may require a high-output alternator.
| Setup | Stock Alternator OK? |
|---|---|
| Single AGM auxiliary | Yes |
| Lithium + solar | Often needs upgrade |
| Multi-battery build | Upgrade recommended |
Will a Second Battery Void My Warranty?
Modifications can affect warranty coverage on electrical components. Check your vehicle’s warranty terms and consider professional installation to reduce risk.
Quick Summary
- Always use an isolator or DC-DC charger
- Basic installs take 2-4 hours
- Check warranty terms before modifying wiring
Conclusion: Adding a Second Battery to Your Truck or SUV
Adding a second battery to your truck or SUV unlocks reliable power for winches, fridges, and camp gear. With the right isolator, cables, and battery, your setup stays safe and dependable.
The key takeaway is simple: never skip the isolator or fuses. Match your battery chemistry and mount everything securely.
Ready to get started? Gather your tools, pick your components, and follow the steps above. Your rig will be adventure-ready in no time.
With careful planning, a dual battery system delivers years of worry-free power.
Frequently Asked Questions About Adding a Second Battery to a Truck or SUV
What is the best way to add a second battery to a truck?
The best way is to use an isolator or DC-DC charger between your starting and auxiliary batteries. This protects your starting battery from draining while powering accessories.
Mount the auxiliary battery securely, run 4-6 AWG cable, and fuse both positive leads within 18 inches of each battery. This proven method ensures safe, reliable performance.
How much does it cost to add a second battery to a truck or SUV?
Most DIY dual battery installs cost between $400 and $1,200 in parts. This includes the auxiliary battery, isolator or charger, cables, fuses, and mounting hardware.
Professional installation adds $300 to $800 in labor. Lithium batteries and solar upgrades push costs higher, while simple AGM setups stay on the lower end.
Can I add a second battery without upgrading my alternator?
Yes, most stock alternators handle a single auxiliary battery without issue. A standard AGM setup draws modest charging current that factory alternators manage easily.
However, lithium batteries, solar systems, or multi-battery builds may need a high-output alternator. Upgrade to 200A or more if you run heavy accessories regularly.
Do I need an isolator or a DC-DC charger for my dual battery setup?
An isolator suits simple builds with traditional alternators. It connects batteries only when charging and disconnects them automatically when the engine stops.
A DC-DC charger is better for modern vehicles with smart alternators. It boosts voltage to properly charge AGM or lithium auxiliary batteries, ensuring full capacity and longer life.
How long can I run a fridge on a second battery?
A 100Ah auxiliary battery runs a 50W fridge for roughly 20 hours before needing a recharge. Actual runtime depends on ambient temperature and fridge efficiency.
Lithium batteries deliver more usable capacity, often extending runtime to 30+ hours. Adding solar panels keeps the battery topped up during extended camping trips.
What size cable should I use for a dual battery system?
Use 4-6 AWG copper cable for runs under 15 feet to minimize voltage drop. Thicker cable handles higher current and keeps charging efficient.
Longer runs or heavy winch loads require larger cable, such as 2 AWG or 1/0 AWG. Always crimp lugs securely and protect connections with heat shrink.
Why is my auxiliary battery not charging?
Common causes include a blown fuse, loose connection, or faulty isolator. Check both fuses near each battery and inspect terminal connections for corrosion or looseness.
Test voltage with a multimeter while the engine runs. You should see 13.5-14.5V at the auxiliary battery. If not, the isolator or charger may need replacement.
Can I use two different batteries in a dual battery setup?
You can, but matching chemistry, age, and capacity is strongly recommended. Mismatched batteries charge unevenly, causing one to overcharge and the other to undercharge.
If mixing is unavoidable, use a DC-DC charger to manage each battery independently. This prevents damage and extends the life of both batteries.