
Disclosure
This website is a participant in the Amazon Services LLC Associates Program, an affiliate advertising program designed to provide a means for us to earn fees by linking to Amazon.com and affiliated sites.
Learning how to install a battery hold-down correctly protects your battery from vibration damage and prevents dangerous movement. A secure hold-down extends battery life and keeps your vehicle safe on every drive.
This complete guide covers expert tips for choosing the right hold-down, step-by-step installation methods, and proven techniques for a lasting fit. Keep reading to secure your battery with confidence.
Key Takeaways
- Snug, not crushing: tighten hardware until the battery cannot shift, never until the case flexes.
- Match the type: top-frame, bottom-clamp, and J-hook kits fit different tray designs.
- Inspect every 6 months for corrosion, stretched bolts, and cracked plastic brackets.
- Add a rubber pad under the tray to cut vibration and extend battery life.
- Never use zip ties or bungee cords as a permanent replacement.
Best Battery Hold-Down Kits for Secure Installation
Choosing the right kit makes installation faster and safer. These three options cover most vehicles, from daily drivers to off-road builds, and each one delivers reliable, long-lasting battery security.
Dorman 00589 Battery Hold-Down Kit – Best Overall Choice
The Dorman 00589 is the recommended choice for most standard top-post batteries. Its universal J-hook design fits Group 24, 27, and 35 trays, and the corrosion-resistant rods and clamp resist acid fumes. Ideal for daily drivers needing a quick, dependable replacement without drilling or custom fabrication.

Optima 24270 Red Top Hold-Down – Best for AGM Batteries
The Optima 24270 is purpose-built for Optima Red, Yellow, and Blue Top batteries. Its precision-molded base clamp locks the case firmly, preventing the shifting that damages AGM plates. This is the best option for performance, marine, and off-road builds running Optima power.

OEM Toyota 74404-0C030 Battery Clamp – Best Factory-Fit Option
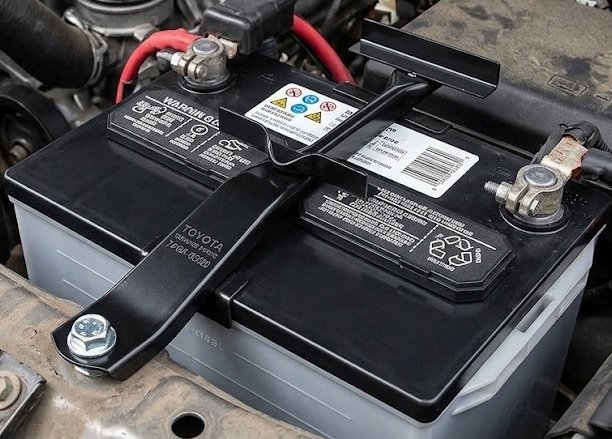
The Toyota 74404-0C030 delivers exact factory fitment for Tundra, Sequoia, and Land Cruiser models. Genuine OEM steel construction and pre-bent brackets mean no modification and perfect alignment. Ideal for owners who want original-equipment reliability and a clean, stock appearance.
Why a Proper Battery Hold-Down Matters
A loose battery is more than a minor annoyance. It is a genuine safety and reliability risk that affects every vehicle on the road.
Safety Risks of a Loose Battery
Vibration causes a loose battery to slide and rock inside the tray. This movement can crack the case, spill acid, or short the terminals against metal.
- Fire hazard: A shifting positive terminal can arc against the hood or frame.
- Acid leaks: Cracked cases drip corrosive fluid onto wiring and paint.
- Sudden stalls: Interrupted connections cut power mid-drive.
How Vibration Damages Battery Internals
Even a snug-looking battery suffers internally when not clamped. Constant jolting shakes the lead plates and sheds active material, which shortens service life.
AGM and gel batteries are especially vulnerable because their internal structure relies on compression. A quality hold-down preserves that compression and protects your investment.
Quick Summary
- A secure hold-down prevents acid leaks, shorts, and stalls.
- Vibration destroys internal plates over time.
- Proper clamping can add years to battery life.
Legal and Inspection Requirements
Many states require a secured battery to pass safety inspection. A missing or broken hold-down can fail a vehicle inspection outright.
Racing sanctioning bodies also mandate secure mounting, so track drivers cannot skip this step.
Signs Your Hold-Down Needs Attention
- Battery moves when you push it by hand.
- Rusted or stretched J-hooks and bolts.
- Cracked plastic bracket or tray.
- White or blue corrosion around terminals.
Spotting these early prevents bigger problems. Next, we cover the tools and steps for a correct installation.
Tools and Preparation Before You Install a Battery Hold-Down
Gathering the right tools first keeps the job quick and safe. A few minutes of prep prevents stripped threads and damaged terminals.
Essential Tools and Materials
- Socket set (10mm, 13mm, and 14mm are most common)
- Torque wrench for accurate tightening
- Battery terminal brush and baking soda solution
- Anti-corrosion spray or dielectric grease
- Replacement hold-down kit matched to your tray type
Safety Precautions You Should Never Skip
Batteries contain sulfuric acid and produce explosive hydrogen gas. Always work in a ventilated area away from sparks or open flames.
- Disconnect the negative terminal first, then the positive.
- Wear safety glasses and acid-resistant gloves.
- Never lay tools across the battery top.
Identifying Your Hold-Down Type
Confirm which style your vehicle uses before buying parts. The three common designs are:
- Top-frame clamp: A bar or bracket pressing down on the battery top.
- Bottom-clamp: Wedge brackets gripping the battery base.
- J-hook and rod: Hooks under the tray with a top crossbar.
Quick Summary
- Match your kit to the tray design before starting.
- Disconnect negative first to avoid shorts.
- Ventilation and eye protection are mandatory.
With tools ready and the correct type identified, you can move on to the actual installation steps.
Step-by-Step Battery Hold-Down Installation
Follow these steps carefully to install a battery hold-down correctly. The process takes about 15 minutes for most vehicles.
Step 1: Remove the Old Hold-Down and Battery
- Disconnect the negative cable, then the positive.
- Unbolt the old bracket or unhook the J-rods.
- Lift the battery straight up and set it aside.
Step 2: Clean the Tray and Terminals
Corrosion left in the tray accelerates rust and damages the new hardware. Scrub the tray with a baking soda and water paste, then rinse and dry it fully.
- Remove all acid residue from tray and cables.
- Inspect for cracks or rust-through before reinstalling.
- Add a rubber pad to reduce vibration.
Step 3: Seat the Battery and Fit the Hardware
Lower the battery into the tray with the terminals facing the correct direction. Confirm it sits flat with no rocking before attaching hardware.
Thread the J-hooks or align the top frame, then hand-tighten all fasteners first. This prevents cross-threading and ensures even pressure.
Step 4: Tighten to Specification
Snug the hardware until the battery cannot shift, but stop before the case flexes. Most manufacturers specify 5–7 ft-lbs (roughly 60–84 in-lbs) for hold-down bolts.
- Over-tightening cracks plastic cases and trays.
- Under-tightening lets the battery slide.
- Recheck torque after the first 100 miles.
Quick Summary
- Clean and inspect the tray before reinstalling.
- Hand-tighten first, then torque to spec.
- Recheck tightness after 100 miles.
Once tightened correctly, reconnect the cables and verify the battery is rock-solid.
Common Battery Hold-Down Mistakes and How to Avoid Them
Even experienced DIYers make small errors that undermine a good installation. Avoiding these common mistakes keeps your battery secure for years.
Over-Tightening and Under-Tightening
Over-tightening cracks plastic trays and warps thin brackets. Under-tightening lets the battery shift and chafe the cables.
- Use a torque wrench instead of guessing by feel.
- Stop at 5–7 ft-lbs for most hold-down bolts.
- Recheck after 100 miles as hardware settles.
Using the Wrong Hardware
Zip ties, bungee cords, and rope are temporary fixes at best. They stretch, rot, and fail under vibration and heat.
| Hardware | Safe? | Notes |
|---|---|---|
| OEM bracket | Yes | Best fit and durability |
| J-hook kit | Yes | Universal, corrosion-resistant |
| Zip ties | No | Brittle, stretch over time |
| Bungee cords | No | Lose tension, snap under heat |
Skipping Corrosion Protection
Bare metal hardware rusts fast near battery acid fumes. Coat bolts and hooks with anti-corrosion spray or dielectric grease before final tightening.
Ignoring Tray Damage
A cracked or rusted tray cannot hold hardware securely, no matter how tight the bolts are. Replace a damaged tray before installing a new hold-down.
- Inspect for cracks around mounting holes.
- Check for rust-through on metal trays.
- Replace, don’t patch structural damage.
Quick Summary
- Torque to spec, never guess.
- Skip zip ties and bungee cords.
- Replace damaged trays before installing.
Correcting these mistakes ensures your installation holds up under real-world driving conditions.
Maintenance Tips to Keep Your Battery Hold-Down Secure
Installation is only half the job. Regular checks keep your battery hold-down working properly for the life of the battery.
How Often Should You Inspect the Hold-Down?
Check the hold-down every 6 months and before long road trips. Vehicles driven on rough roads or off-road should be inspected every 3 months.
- Push test: The battery should not move at all.
- Visual check: Look for rust, cracks, or loose bolts.
- Corrosion scan: White or blue powder signals acid exposure.
Cleaning and Protecting Hardware
Dirt and acid buildup accelerate corrosion on brackets and bolts. A quick clean twice a year prevents most hardware failures.
- Disconnect the negative cable before cleaning.
- Scrub with baking soda paste and rinse thoroughly.
- Dry completely to prevent flash rust.
- Apply anti-corrosion spray to hardware and terminals.
When to Replace the Hold-Down
Hardware has a lifespan even with good care. Replace the hold-down immediately if you notice any of these signs:
- Stretched or bent J-hooks that no longer grip.
- Stripped threads that will not hold torque.
- Cracked plastic brackets or clamps.
- Heavy rust weakening the metal structure.
Quick Summary
- Inspect every 6 months, or 3 months off-road.
- Clean and coat hardware twice a year.
- Replace stretched, cracked, or rusted parts.
Consistent maintenance means your hold-down stays reliable through every season and every mile.
Specialty Battery Hold-Down Situations and Solutions
Not every vehicle uses a standard top-frame clamp. Specialty setups require different approaches to stay secure and safe.
Off-Road and Performance Vehicles
Off-road driving subjects batteries to extreme vibration and shock loads. Standard hardware often loosens under these conditions.
- Billet aluminum brackets resist flex far better than stamped steel.
- Rubber isolation mounts absorb shock before it reaches the case.
- Grade 8 bolts resist stretching under repeated vibration.
Racing rules often require a metal-to-metal hold-down plus a secondary strap, so check your sanctioning body’s spec before building.
Marine and RV Battery Installations
Marine and RV batteries face constant motion, moisture, and temperature swings. Corrosion protection becomes even more critical here.
| Environment | Key Concern | Best Solution |
|---|---|---|
| Marine | Saltwater corrosion | Stainless steel hardware |
| RV | Road vibration | Heavy-duty J-hook kit |
| Off-road | Shock loads | Billet bracket + strap |
Oversized and Non-Standard Batteries
Group 31, lithium, and dual-battery setups rarely fit stock trays. Adapter plates and universal hold-down kits solve most fitment gaps.
- Measure the case before ordering any kit.
- Use adapter trays to match Group 24/27/31 footprints.
- Never stack spacers to fake a proper fit.
Quick Summary
- Off-road builds need billet brackets and straps.
- Marine setups demand stainless hardware.
- Oversized batteries require adapter trays.
Matching hardware to your environment prevents failures that standard kits cannot handle.
How to Tell If Your Battery Hold-Down Is Installed Correctly
After installation, a quick verification confirms the job was done right. These checks take less than five minutes and catch problems early.
The Push and Pull Test
Grip the battery case and push it firmly in every direction. It should not move, rock, or shift even slightly.
- Zero movement means the hold-down is working.
- Slight rocking signals loose hardware or a warped tray.
- Side-to-side sliding means the bracket is too small or misaligned.
If the battery moves, re-torque the hardware and recheck. Persistent movement points to a mismatched kit or damaged tray.
Checking Hardware and Clearance
Confirm no hardware touches the terminals or cables. Metal contact with a terminal creates a dangerous short circuit.
- Inspect clearances between the bracket and both terminals.
- Verify cable routing is not pinched or stretched.
- Confirm the hood closes without contacting the battery or hardware.
Post-Installation Voltage Check
A quick multimeter reading confirms the electrical connection is solid. A healthy resting battery reads 12.4–12.7 volts.
| Reading | Meaning | Action |
|---|---|---|
| 12.6V+ | Fully charged | None needed |
| 12.2–12.4V | Partially discharged | Recharge battery |
| Below 12.0V | Weak or failing | Test or replace |
Quick Summary
- The battery should not move when pushed.
- Hardware must never touch the terminals.
- Verify 12.4–12.7V at rest.
Passing all three checks confirms a professional-quality installation that will hold up over time.
Conclusion: Installing a Battery Hold-Down the Right Way
A correct battery hold-down installation protects your battery, your wiring, and your safety. With the right kit, proper torque, and routine checks, the job lasts for years.
Remember the golden rule: snug, never crushing. Torque to spec and inspect every six months.
Grab your tools, verify your tray type, and install your hold-down today. Your battery will thank you.
Frequently Asked Questions About Battery Hold-Down Installation
What is a battery hold-down and why is it important?
A battery hold-down is a bracket, clamp, or strap system that secures the battery to its tray. It prevents movement caused by vibration, cornering, and rough roads.
Without one, the battery can slide, crack, or short against metal. This creates fire hazards, acid leaks, and sudden electrical failures. Most states also require a secured battery to pass safety inspection.
How tight should battery hold-down bolts be?
Tighten hold-down bolts to about 5–7 ft-lbs (60–84 in-lbs) for most vehicles. The battery should not move when pushed, but the case should never flex or crack.
Always use a torque wrench rather than guessing by feel. Over-tightening damages plastic trays and battery cases, while under-tightening allows dangerous movement. Recheck torque after the first 100 miles of driving.
Can I use zip ties or bungee cords as a hold-down?
No. Zip ties and bungee cords are temporary fixes at best. They stretch, become brittle, and fail under heat and vibration.
Only use purpose-built hardware like OEM brackets, J-hook kits, or billet aluminum mounts. These are engineered to withstand years of vibration and hold proper torque without loosening.
How do I know which battery hold-down type fits my vehicle?
Check your existing tray design first. Top-frame clamps press down on the battery, bottom-clamps grip the base, and J-hook kits hook under the tray with a top crossbar.
Also measure your battery group size (24, 27, 31, etc.). Matching both the tray type and case dimensions ensures a proper fit without drilling or modification.
How often should I inspect my battery hold-down?
Inspect every 6 months for standard driving and every 3 months for off-road or marine use. Look for loose bolts, rust, cracks, and corrosion.
Perform a simple push test each time. If the battery moves at all, re-torque the hardware immediately. Early detection prevents bigger problems like tray damage or terminal shorts.
Why does my battery keep coming loose?
Persistent loosening usually means stretched J-hooks, stripped threads, or a cracked tray. Vibration slowly works hardware free when these parts wear out.
Replace damaged hardware rather than re-tightening it repeatedly. Adding a rubber pad under the battery also reduces vibration and helps hardware stay tight longer.
Do I need a special hold-down for an AGM or lithium battery?
Yes, in most cases. AGM and lithium batteries are sensitive to vibration and often use different case dimensions than standard lead-acid units.
Use a hold-down designed for your specific battery type. Optima batteries, for example, require their own precision-molded clamp. Never force a universal kit to fit a specialty battery.
What should I do if my battery tray is cracked or rusted?
Replace the tray before installing any new hold-down hardware. A damaged tray cannot hold bolts securely, no matter how tight you make them.
Inspect for cracks around mounting holes and rust-through on metal trays. Replacement trays are inexpensive and restore a safe, solid mounting foundation for your battery.