
Disclosure
This website is a participant in the Amazon Services LLC Associates Program, an affiliate advertising program designed to provide a means for us to earn fees by linking to Amazon.com and affiliated sites.
Testing rechargeable batteries before reuse protects your devices and saves money. This complete guide shows you proven methods to check battery health safely and accurately at home.
You’ll learn simple voltage checks, capacity tests, and expert tips for spotting failing cells. Keep reading to master each step and extend the life of every battery you own.
Key Takeaways
- 1.2V is a healthy reading for most NiMH cells at rest.
- Voltage below 1.0V usually means the battery is failing.
- Capacity tests reveal real health better than voltage alone.
- Heat, swelling, or corrosion means dispose immediately.
- Recharge batteries only after passing a full health check.
Best Battery Testers for Checking Rechargeable Batteries – Detailed Comparison
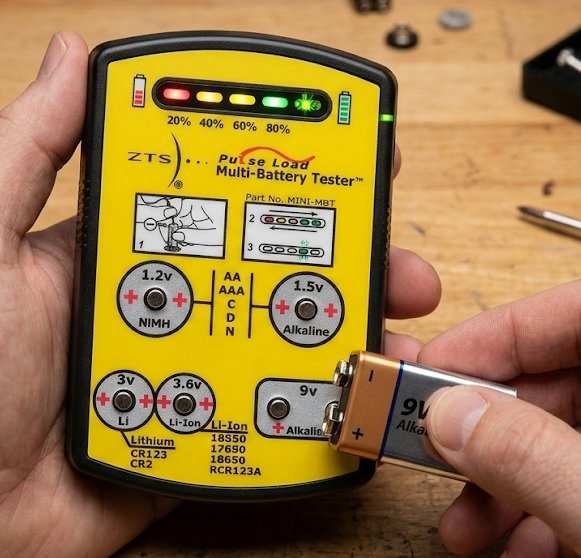
ZTS Mini Multi-Battery Tester (MBT-1) – Best Overall Choice
The ZTS MBT-1 is the recommended tool for testing rechargeable batteries quickly. It uses pulse-load technology to measure actual capacity, not just surface voltage. Ideal for NiMH, NiCd, and lithium cells, it delivers accurate results in seconds without draining your batteries.
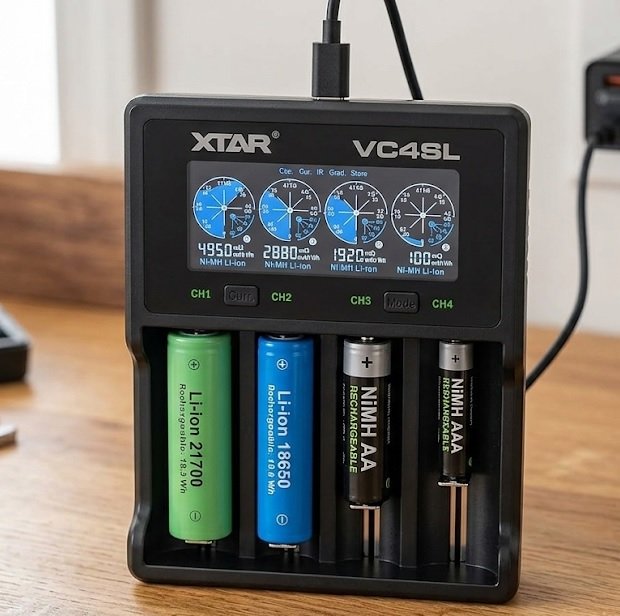
XTAR VC4SL Charger and Tester – Best for Capacity Testing
The XTAR VC4SL is the best option for detailed capacity analysis. It charges, discharges, and refreshes batteries while displaying real mAh readings on its LCD screen. Perfect for users who want to grade cell health and identify weak batteries before reuse.
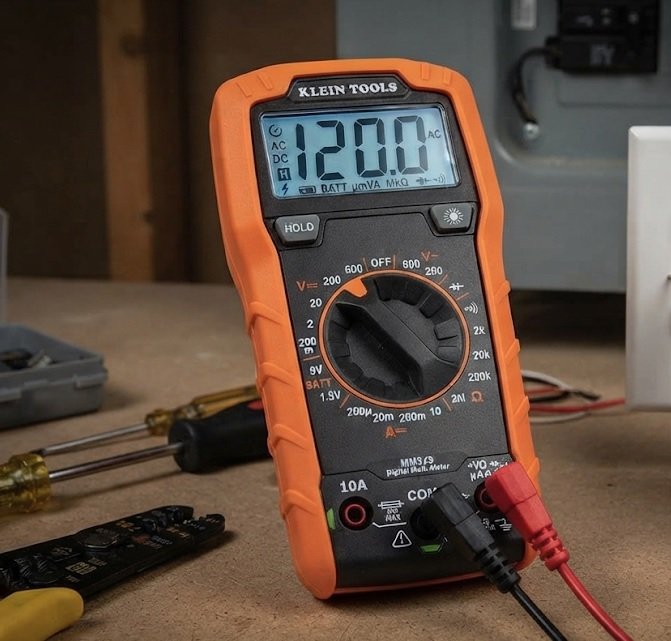
Klein Tools MM325 Multimeter – Best Budget Multimeter
The Klein Tools MM325 is ideal for quick voltage checks on any rechargeable battery. It offers auto-ranging detection, a backlit display, and durable construction at an affordable price. A solid entry-level pick for beginners learning how to test batteries safely.
How to Test Rechargeable Batteries Safely: Voltage, Load, and Capacity Checks
Testing rechargeable batteries properly requires more than a quick glance at a charger light. A multimeter, a load tester, and a capacity test each reveal different health signals. Follow these steps to check any cell with confidence.
Step 1: Visual Inspection Before Any Testing
Always inspect batteries before connecting them to test equipment. Damaged cells can leak, overheat, or short-circuit during testing.
- Look for swelling: A bulging wrapper means the cell is failing internally.
- Check terminals: White crust or corrosion blocks reliable readings.
- Smell the battery: A sweet or chemical odor signals leakage.
Discard any battery showing these warning signs immediately.
Step 2: Measure Resting Voltage with a Multimeter
Set your multimeter to DC voltage and touch the probes to the terminals. Record the reading after the battery rests for one hour.
| Battery Type | Healthy Voltage | Replace If Below |
|---|---|---|
| NiMH (1.2V) | 1.2V – 1.3V | 1.0V |
| NiCd (1.2V) | 1.2V – 1.3V | 1.0V |
| Li-ion (3.7V) | 3.6V – 4.2V | 3.0V |
Step 3: Run a Load or Capacity Test
Voltage alone can mislead you because weak cells often show full voltage under no load. A load test applies resistance and reveals true performance.
- Load tester: Confirms the battery holds voltage under demand.
- Smart charger: Displays real capacity in mAh after a full cycle.
- Compare results: Cells below 80% of rated capacity are degraded.
These three checks together give you a complete picture of battery health.
Common Rechargeable Battery Problems and How to Spot Them Early
Even healthy-looking batteries can hide serious faults. Knowing the warning signs helps you avoid device damage, overheating, and safety hazards. Here are the most common problems and how to detect them.
Signs a Rechargeable Battery Is Failing
Degraded cells rarely die suddenly. They usually show gradual symptoms you can catch during routine testing.
- Fast self-discharge: A cell losing charge within days is worn out.
- Excessive heat: Batteries that get hot during charging are unsafe.
- Short runtime: Devices dying quickly signal reduced capacity.
- Inconsistent voltage: Readings that jump around indicate internal damage.
Why Voltage Readings Can Mislead You
A battery can show 1.2V at rest yet fail instantly under load. This happens because internal resistance rises as cells age. Always pair voltage checks with a load or capacity test for accurate results.
Quick Check
- Voltage alone is not enough
- Heat and swelling = dispose now
- Test under load for real results
When to Recycle Instead of Reuse
Some batteries cannot be saved, no matter how you test them. Recycling is the only safe option in these cases.
- Visible swelling or a deformed casing
- Leaking electrolyte or white residue
- Capacity below 50% of the original rating
- Physical damage from drops or punctures
Drop these cells at a certified battery recycling point. Never toss them in regular trash.
How to Test Different Rechargeable Battery Types Correctly
Not all rechargeable batteries test the same way. Each chemistry has unique voltage ranges and testing quirks. Use the right method for each type to get accurate results.
Testing NiMH and NiCd Batteries
Nickel-based cells are the most common household rechargeables. They hold 1.2V nominal voltage and tolerate frequent testing well.
- Rest first: Wait one hour after charging before measuring voltage.
- Expect 1.2V-1.3V: Fresh NiMH cells often read slightly higher.
- Refresh old cells: A smart charger‘s refresh mode can revive mildly degraded NiCd batteries.
These batteries benefit most from capacity testing since voltage stays stable until near-empty.
Testing Lithium-Ion Batteries
Li-ion cells demand extra caution because of fire risk. Never test a swollen or damaged lithium battery.
- Full charge voltage: Expect 4.2V per cell when fully charged.
- Storage voltage: Around 3.7V is ideal for unused cells.
- Cutoff point: Below 3.0V, the cell may be permanently damaged.
Quick Comparison of Testing Methods
| Battery Type | Best Test Method | Key Warning Sign |
|---|---|---|
| NiMH / NiCd | Capacity test | Fast self-discharge |
| Li-ion | Voltage + load test | Swelling or heat |
| Lead-acid | Load test | Voltage drop under load |
Remember
- Match the test to the chemistry
- Li-ion needs extra safety care
- Capacity beats voltage for accuracy
Testing the right way per chemistry keeps your results reliable and your devices safe.
Best Practices for Testing and Reusing Rechargeable Batteries
Smart testing habits extend battery life and keep your devices running safely. Follow these expert tips to get the most from every cell you own.
Build a Simple Battery Testing Routine
Consistency matters more than expensive equipment. A regular testing schedule catches problems before they damage your devices.
- Label each battery with a purchase date using a marker.
- Test every three months with a multimeter or smart charger.
- Log capacity readings to track gradual degradation over time.
- Rotate battery sets so all cells age evenly.
This routine takes minutes but prevents frustrating mid-use failures.
Match Batteries to the Right Devices
Even healthy batteries perform differently across devices. Pairing them wisely maximizes performance and lifespan.
- High-drain devices: Cameras and flashlights need top-capacity cells.
- Low-drain devices: Clocks and remotes work fine with older batteries.
- Never mix brands: Different chemistries drain unevenly and risk damage.
Storage and Charging Tips That Protect Battery Health
How you store and charge batteries affects how long they last. Poor habits shorten lifespan fast.
- Store at 40-50% charge for lithium cells during long breaks.
- Keep batteries cool and dry away from direct sunlight.
- Avoid overcharging: Remove cells once the charger completes.
Pro Tips
- Label and log every battery
- Match cells to device drain
- Store cool at partial charge
Good habits plus regular testing mean fewer replacements and safer devices.
Tools and Safety Guidelines for Testing Rechargeable Batteries at Home
Having the right tools makes battery testing faster and safer. You don’t need a lab—just a few affordable devices and smart safety habits.
Essential Tools for Accurate Battery Testing
Start with a basic kit and expand as your needs grow. These tools cover nearly every household battery type.
- Digital multimeter: Measures voltage quickly and affordably.
- Smart charger: Displays capacity and refreshes degraded cells.
- Battery tester: Applies load for realistic performance readings.
- Infrared thermometer: Detects dangerous heat during charging.
A multimeter and smart charger alone handle most testing tasks.
Safety Rules You Should Never Skip
Battery testing carries real risks if you cut corners. Follow these rules every single time.
- Work in a ventilated area away from flammable materials.
- Never test swollen cells—recycle them immediately.
- Wear safety glasses when handling damaged batteries.
- Keep a fire extinguisher nearby for lithium testing.
Common Testing Mistakes to Avoid
Even experienced users make errors that skew results. Watch out for these frequent pitfalls.
- Testing hot batteries: Wait until cells cool to room temperature.
- Ignoring internal resistance: High resistance means a failing cell.
- Skipping the load test: Voltage alone hides weak batteries.
Safety First
- Ventilate your workspace
- Never test swollen cells
- Always run a load test
Safe tools and careful habits protect both you and your devices.
Interpreting Battery Test Results: What the Numbers Really Mean
Raw readings mean little without context. Learning to interpret voltage and capacity data tells you whether a battery is reusable, marginal, or ready for recycling.
Understanding Voltage and Capacity Readings
Voltage shows current charge state, while capacity reveals true health. Both numbers together paint the full picture.
- 1.2V-1.3V (NiMH): Healthy and ready for reuse.
- 1.0V-1.1V: Marginal—retest after a full charge.
- Below 1.0V: Likely degraded or damaged.
- 80%+ rated capacity: Excellent condition.
- 50-80% capacity: Usable in low-drain devices.
Reading Internal Resistance and Load Drop
Internal resistance rises as batteries age, causing voltage to sag under load. A cell that drops sharply during a load test is failing, even if resting voltage looks normal.
| Reading | Meaning | Action |
|---|---|---|
| Stable under load | Healthy cell | Reuse normally |
| Slight voltage drop | Mild aging | Use in low-drain devices |
| Sharp voltage drop | High resistance | Recycle the battery |
Deciding Whether to Reuse or Recycle
Use this simple decision framework after every test.
- Passes voltage and load test? Reuse it confidently.
- Marginal capacity? Demote it to low-drain devices.
- Fails any test? Recycle it responsibly.
Decision Guide
- 80%+ capacity = reuse
- 50-80% = low-drain only
- Fails load test = recycle
Clear interpretation turns confusing numbers into confident decisions.
Extending Rechargeable Battery Life After Testing
Passing a test doesn’t guarantee long-term performance. How you charge, use, and maintain batteries after testing determines how many cycles they survive.
Smart Charging Habits That Add Cycles
Charging correctly is the easiest way to extend battery lifespan. Poor charging habits cause more damage than regular use.
- Avoid full discharges: Recharge NiMH cells before they hit empty.
- Use the right charger: Match charger settings to battery chemistry.
- Don’t overcharge: Remove cells once charging completes.
- Charge at room temperature: Extreme heat or cold reduces capacity.
How to Store Batteries for Maximum Lifespan
Proper storage prevents slow damage during idle periods. Follow these guidelines for each chemistry.
| Battery Type | Storage Charge | Ideal Temperature |
|---|---|---|
| NiMH | 40-50% | 15°C-25°C |
| Li-ion | 40-60% | 15°C-20°C |
| Lead-acid | Full charge | 10°C-25°C |
Rotation and Labeling for Even Wear
Batteries used in sets age together. Rotating and labeling them keeps performance balanced across your collection.
- Number each cell so you can track individual performance.
- Rotate sets monthly to distribute wear evenly.
- Retire weak cells early before they drag down strong ones.
Life Extenders
- Charge before fully empty
- Store at partial charge
- Rotate and label every set
These habits turn a tested battery into a long-lasting one.
Conclusion: Test Rechargeable Batteries Before Every Reuse
Testing rechargeable batteries before reuse protects your devices and saves money. Voltage checks, load tests, and capacity readings reveal the truth about battery health.
The key takeaway is simple: never skip the load test. Voltage alone hides failing cells that can damage your electronics.
Grab your multimeter today and test every battery in your drawer. Safe, reliable power starts with one quick check.
You now have the skills to reuse batteries with total confidence.
Frequently Asked Questions about Testing Rechargeable Batteries
What voltage is considered bad for a rechargeable battery?
For NiMH and NiCd cells, anything below 1.0V at rest signals a failing battery. Lithium-ion cells dropping below 3.0V are likely permanently damaged.
These thresholds matter because low voltage often means the cell can no longer hold a charge. Retest after a full charge before deciding to recycle.
How do I test a rechargeable battery without a multimeter?
A smart charger with a capacity display works as an excellent alternative. It charges and discharges the cell while showing real mAh readings.
Many battery testers also apply a load automatically. Both options cost less than $30 and deliver accurate health results without technical skills.
Can a rechargeable battery show full voltage but still be bad?
Yes, and this is the most common testing trap. A worn cell can read 1.2V at rest yet collapse instantly under load due to high internal resistance.
That’s why you should always pair voltage checks with a load or capacity test. Voltage alone never tells the full story.
How often should I test my rechargeable batteries?
Test every three months for regularly used batteries. Cells in storage should be checked every six months.
Label batteries with purchase dates to track aging. This simple habit catches degradation early and prevents device damage.
What should I do if my rechargeable battery gets hot while charging?
Stop charging immediately and unplug the charger. Heat signals internal damage or a faulty charging circuit.
Let the battery cool in a ventilated area, then test its voltage. If it heats again, recycle it—never risk a fire.
Is it safe to reuse old rechargeable batteries in any device?
Only batteries passing voltage, load, and capacity tests are safe for reuse. Marginal cells belong in low-drain devices like clocks or remotes.
Never use questionable batteries in high-drain or expensive electronics. The risk of leakage or failure isn’t worth the savings.
Which is better for testing: a multimeter or a smart charger?
A multimeter is best for quick voltage checks, while a smart charger excels at capacity testing. Each serves a different purpose.
For complete battery health evaluation, use both. The multimeter catches obvious failures fast, and the charger confirms true remaining capacity.
How do I know when to recycle instead of reuse a battery?
Recycle any battery that swells, leaks, overheats, or drops below 50% rated capacity. These cells cannot be restored safely.
Take them to certified recycling points like hardware stores or municipal centers. Never throw rechargeable batteries in regular trash.